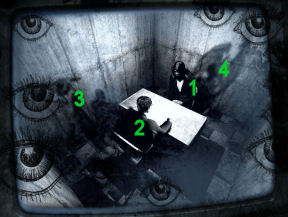
kiat kiat cara bermain Dark Fall Lost souls bisa di lihat di blog saya
Dark
Fall: Lost Souls
by
Darkling Room and Jonathan Boakes
Walkthrough by
MaGtRo December 2009
Gameplay:
The main menu has New game, Load game, Options, Credits and Quit.
Under options: the
selection for subtitles and Easy/Hard gameplay are seen.
The puzzles are the same in both Easy and Hard. The
scissors break easily and there are less time on timed puzzles in Hard.
Thanks, Dumbledore!
Cell phone:
The gameplay menu is in the cell phone that is accessed at bottom left of the
screen. Click the peeking top part of the cell phone.
The top left is the
flashlight that helps illuminate dark areas in the game. When you hear the
word - Here; you can use the flashlight in that area.
Top right icon
accesses the text messages.
Middle left is the
load game icon. Middle right is the save game icon. Open the save or load
frame, scroll through the arrows to select which pictured frame to load or to save on.
Then click the picture to enter the choice. The saves can be overwritten.
There are unlimited save slots.
The gear icon is the
option selection. The selection for subtitles and Easy/Hard gameplay are seen.
The house icon is the
quit selection.
The tunnel
Hear someone being
chased and is out of breath.
The cell phone has a
text message from Echo to the Inspector. You are the Inspector. You arE not
alone. i Am neaR (YEAR).
The inventory has
vodka, clozapine tablets and a letter. Read the letter by
right clicking it. Amy's family is angry at you. Exit the close up using the
pointing down hand.
Close the text page and
open the cell phone again. Click on top left icon to turn on the flashlight.
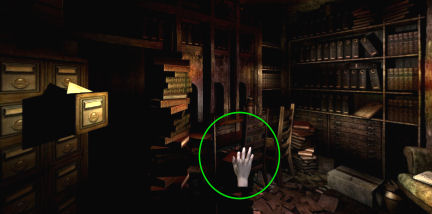
Mannequin: See
a mannequin by a grocery cart full of mannequin parts.
Take the doll leg
#1 held by the mannequin.
Look around the tunnel.
The tunnel has more mannequin parts.
Turn right twice and see
a mattress. Look close at mattress.
Mattress:
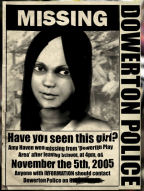
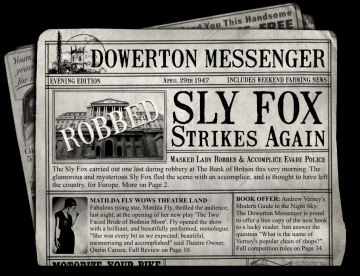
Take and read the Dowerton Messenger about missing Amy Haven. She has
been missing for 5 years now; in 2005 on her birthday. Mr. Bones was arrested
by you, the Inspector. He was released after exposure of planted and faked
evidence. The town's teenagers showed a rise in paranormal and satanic
interest.
Take doll leg #2.
Altar:
Turn right and look close at the makeshift altar.
Read the card right of
the little coffin.
Pieces of Missing
Poster: Put together the pieces of paper to form
the Missing Persons Poster.
Coffin:
Open the coffin by click-hold-move to the left and outside the box. Exaggerate
the move to the left.
Broken doll: Use the 2 doll legs on the doll. Take the broken doll.
Pull back and hear a
sound. Turn around and see that an open space was made when a pushcart fell on
its side. Go through the open space.
Corrugated sheets:
Look around and continue forward the dark tunnel. See that the end is blocked by
corrugated sheets.
Peek behind the
sheets. Hear the train coming. Move the cursor down and enter through the hole
in the sheets.
Look around and see
more rusty shopping carts. Turn to the left side and see a vent or window area.
Look in there and see
mannequins arranged in a row facing a wall.
Pull back and hear the
train come closer. Panic time. Black out and wake up somewhere else.
Check the place.
Dowerton Station
Turn around and go
forward to open air. It is the old abandoned Dowerton Station.
Text message: Do you remEmber this plAce? THink hard (DEATH).
Look around. The rail
track is blocked by weeds. Ahead is the old Station Hotel. Face left
and see a tower. Face right and climb up.
Platform 1:
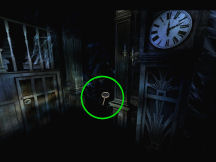
See 2 hanging red fire buckets. Look down and see another red fire bucket. Take fuse
#1 from the fire bucket.
Station depot:
Go forward and be in front of the station depot.
See that the door is
boarded up.
Enter the depot:
The window on the left has a corrugated sheet covering it.
Click-hold-move
way off to the left to remove the sheet. Enter through the
window.
Depot:
Look around.
Ticket machine:
Turn right and see a ticket machine. Look close and take
the T-shaped handle.
Stationmaster:
Go forward to center of room.
The ghost of the
stationmaster stops and warns you with few audible words. He keeps looking to
top left. He must be checking the clock.
Pull back and exit
through the window.
Platform 2:
Cross the rail and climb up to platform 2.
Bridge:
Turn left and climb up the stairs to be at the cross bridge.
Hear a girl giggle.
See the ghost of Amy below.
Look close at the
workbox on a workhorse at far end of bridge. Take fuse #2.
Signal number: Turn right and
look down
off the bridge. See the signal label-numbers under the signal light. The
number identifies this station and is random, so take note of it.
Turn right and go back
down to platform 2.
Go forward to the
steps leading up to the hotel.
A Tale of Four
Sisters - Ashley: Look down while at bottom of the steps
and see a half round stone.
Move the round
stone by click-hold-move to extreme right.
Read the book - A
Tale of Four Sisters. Learn the story of Ashley and how she was torn
apart.
Take note that Ashley
has blue eyes.
Buffet:
Cross the rail to platform 1 and be in front of the door of the buffet. The door
is locked.
Look close and see a
Rappier (Rapier) cigarette machine right of door. It needs coins.
Alley-backyard of station
Go down to the rail, go
left and back up to depot area in platform 1.
Go to right of the depot
pass the red buckets and see an alley entrance. Enter and look around.
Winch cabinet:
Turn to the right and see a cabinet on the wall.
Backyard:
Continue to the back of the alley. See a fire in a drum.
Look close at workbox
on the left and take the winch handle #1 and fuse #3.
Crate:
Turn to the right and see a crate of bricks blocking the power shed (remember
Dark Fall 1).
Look up and see that
the crate is attached to a worn rope on a pulley at top of the building. We need to
raise that crate.
Ladies room:
Enter the ladies toilet at left.
Look close at middle
toilet. Hear the word 'here'. Use the flashlight of the cell phone to have
light.
Take the winch
handle #2. Exit the toilet.
Winch cabinet:
Go back to the winch cabinet on the wall of the alleyway.
Raise the crate
blocking the power shed:
Insert winch handle 1
or 2. They will automatically combine.
Click-hold-move down
3-4 times. If you do it once only, see the crate rise halfway and then
drops.
Do the turn-pull
continuously-fast and the crate will reach the top and lock on the pulley.
Power shed:
Go and enter the shed at the backyard now that the crate is raised.
Have light:
It's dark in here.
Turn left. Look close at shelf and take light bulbs
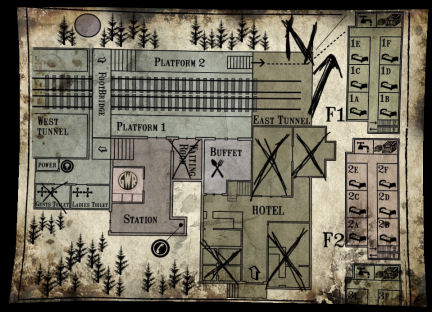
and automatically a map of Dowerton Station and Hotel.
Map: Right click and study
the map in inventory to orient yourself.
The areas that are crossed out are not accessible.
See the round tower at top left.
The top part of the map is north. Note also the
hotel room locations.
Light bulb fixture: Turn to the left of
the door and see a bulb fixture on the wall.
Use light bulb on the
fixture. Click-hold-pull down
the pull string attached to the fixture. Now we can see.
Turn around from the light fixture. See and check the
stack of books on the far wall.
Fuse cabinet: Open the fuse cabinet
on right wall.
Remove the burned
fuses by click-hold-move to extreme left each of the fuses.
Use the 3 collected fuses to
replace the ones removed.
Use the T-shaped
handle taken from the ticket machine on the lever above the fuses.
Click-pull up the
lever at top right to bring power to the station and hotel.
Light turns on around
the station and hotel. See a telephone sign by the depot.
Exit the power shed.
The rope holding the brick crate gave out and the crate crashes down. Very
timely.
Ladies toilet:
Let's check places now that there is light. Enter the ladies toilet. Look
around.
Sink:
Look close at the left sink. Ugh! It's a life leech. It absorbs life and
happiness.
Closed toilet:
Hear a woman crying. Click on the right toilet door. Talk to the woman
completely.
When she stops
talking, open the door. Eek - is that Amy again?
Look in the toilet and
see pieces of paper.
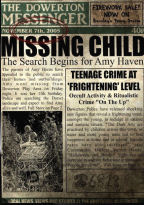
Put together the
pieces of paper to form the #2 Dowerton Messenger about missing Amy Haven.
See a phone #6813
written on the paper.
Look in the toilet
again and take the key attached to a bone. Exit the toilet.
Get an invitation
to a birthday party.
Depot:
Go back through the alleyway to platform 1. Hear a telephone ring.
Enter through the
window by moving the corrugated sheet to the left.
Telephone: Go to the back of the
room. Turn left and see 3 telephone booths.
Enter the left open one and
answer the phone. Talk to Amy.
She invites you to her
birthday party. She wants to play games at top floor of the hotel.
Station office: Check the station
staff office door (GWR). It has a dial lock.
Exit the depot through
the window.
Collect bones.
Buffet:
Go down to the rail; go right and up to the Buffet door.
Use the key attached
to a bone on the padlock. The key disappeared but bone #1 is kept.
Enter the buffet.
Text message: HE WAS your main suspect. YOUR only SUSPECT (HE WAS YOUR SUSPECT).
Read the menu on the
table in front of you. These are Latin-scientific names of animals.
Mannequins: Turn left and see a
couple of mannequins. The male mannequin is
holding out a plate. Gross! Click on the plate of yuckies and get bone #2.
Go forward to the
room.
Text message:
you Should hAVE searcHed harder. donE youR job. (SAVE HER).
Divination table: Check the
table and see a tin can with 15 marked on it. There are some bones in the can.
Shake and click to throw out the bones. The bones
form a pattern. There are 10 bones in the can. We need to have 15. We already
collected 2. We need 3 more.
Bar:
Turn around to bar. See a chopping board with yuckies. Take bone #3
from the mess.
Check the bar itself.
Click on frying pan to take bone #4.
Box:
Turn around and look at the male mannequin. His left hand is pointing up.
Go close to him and
look up. See a box in the rafters.
Click-hold-move to
extreme right on the box. Look inside the box.
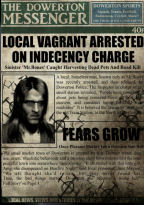
Dowerton
Messenger: See bits of paper again.
Put together the
pieces of paper to form the #3 Dowerton Messenger about Mr. Bones.
Mr. Bones is caught
harvesting dead pets and road kill.
Ugh - are these meals
in the Buffet, pets and road kill?
Exercise book:
Read the exercise book and take 4 circuit boards.
Learn about an
experiment using bones to summon angels. They recorded the procedure in a
tape player. They called and talked to the Forgotten.
Click on the right
edge of the book and see a picture of the experiment: tin can, bones, tape
player with tape and GWR. We saw those letters before at the Depot.
Letter:
Click on the bag to
get a letter.
Read the Headmistress letter and learn
that Amy has been expelled from St. Swithin's School for Girls. She has
violent mood swings, bizarre ritualistic
behavior and morbid fascinations.
Click the bag again
and take bone #5.
See Amy draw the
hotel on a wall in a room with cans on a shelf.
Get the tape
recorder.
Hotel door:
Go forward to end of the room to the hotel doorway.
See a radio on the table.
Look at the Station
Hotel card - the phone numbers are crossed out.
Dark Fall Book: Take the
red book with Dark Fall icon on the cover behind the radio.
Open the book and see
that it was taken out 3 times: once in 1947, once by Mr. Bones and Amy on Nov.
3rd.
Turn the page to see
page I with an icon and primitive people worshiping an ?eclipse?
The hotel door is
locked.
Depot:
Enter the depot through the window.
See the Staff room has
the GWR-Great Western Railway mark and dial lock.
Find the dial lock
code:
Go to back room and
then turn right. Go to end of room and look around.
Turn to face the
ticket window. Look close and hear 'here'. Use the flashlight on the cell
phone.
Read the letter
written by the stationmaster. He wrote on green ink: enter my Staff Code on
the door lock. Remember to include the Station Number Code first. You should
have 8 numbers in all...
Read the Staff manual.
Note the color coding for different Staff. The stationmaster uses green ink.
His duties do NOT include packages, refuel lamp oil, telephone money emptied
and ticket inspection.
Station number
and stationmaster code:
1. Look at the
clipboard on the bench with lamps close to the telephone booth.
Check the 3 numbers
at top left of the page. Some are crossed out. This is random.
Check and take note
of the green numbered codes on the work assignment. Since the
stationmaster does not refuel lamp oil; Mail (dispatch) is done by the
stationmaster.
Take note of that number.
2. Turn around. Look
close at the clipboard propped on the chair.
Check the 3 numbers
at top left of the page. Some are crossed out. This is random.
Check and take note
of the green numbered codes on the work assignment - one of them is done by
the stationmaster. Since he does not refuel lamp oil; Mail
(dispatch) is done by the stationmaster.
3. Go to the Staff
room door, turn around and look close at the clipboard propped on the
suitcases-boxes.
Check the 3 numbers
at top left of the page. Some are crossed out. This is random.
Check and take note
of the green numbered codes on the work assignment - one of them is done by
the stationmaster. Since he does not do refuel lamp oil; Mail
(dispatch) is done by the stationmaster.
Dial lock:
Now you should have the 3 digit station code from top left of the clipboards and the 5 digit stationmaster
code from his work assignment. Enter this code on the dial lock.
Enter a number by
pressing either left or right part of the dial to place that number under
the arrow on top. Then press the 'enter' button.
Place the next
number under the arrow on top and then press the 'enter' button.
Press the enter button after placing each number
under the top arrow.
Do this to all 8
digits. If a mistake is done, press the 'reset' button.
Staff room:
Look around.
A Tale of Four
Sisters - Rowan: Look close at the ticket window at
left.
Read the book - A
Tale of Four Sisters. Learn the story of Rowan and how she drowned.
Take note that
Rowan has green eyes.
Armchair:
Read the 'Horror Hotel' headline of the newspaper. Learn about the series of
suicides at the hotel.
Move the cursor at
top left corner of the chair to get a coin-farthing.
Tape recorder:
Open the box on the floor to get the tape recorder. Now for the tapes.
Find the tapes.
Signal Setting
cabinet: Open the cabinet on the wall above the
armchair.
A voice asks to
enter the settings.
Emergency
Signalling Guide: Pick up the Emergency Signalling
Guide on the chair by the ticket counter at left.
Read the last 2
pages. It states that the signal number and settings can be determined by
the signal label. The label is made by 2 letters and 3 numbers.
The letters is the
station ID. For this station, it is DT or Dowerton or E.
Open to the previous
page. See figures for the different railway lines. Dowerton is part of the
GWR-Great Western Railway. There are several figure numbers in that page.
To get the correct
figure numbers and if you forgot to note it down: Go
out to platform 2, turn left and up to the cross bridge. Look right and look
close at the signal label under the signal lights on the wall right of the
rails. See and take note of the numbers after DT (for Dowerton). This number
is random.
Go back to the depot
and then staff office.
Check the book
again. Open to Great Western Railway and look for the numbers seen under the
signal light. Take note of the pattern of light and dark squares.
Enter the
emergency code: Open the cabinet.
At top part of
panel, press to enter E for Dowerton.
On the bottom 3
rows, enter the pattern seen in the book for the number seen under the
signal light outside. The white boxes mean the lights are on.
Flip the switch at
right. If correctly done, see the Emergency Stop activated for Dowerton.
The red light shows
a break on the fence right of the signal light.
Woods:
Exit the depot and go left. Cross the rail towards the signal light. Climb up
and through the break in the fence.
Turn right and take a
steering wheel with a GG at center.
Tower:
Face the tower and hear owls hooting.
Climb the ladder until
the top.
Use the cell phone
flashlight and see the hatch covered by lots of chains and padlocks.
Tapes:
The tapes are behind the chains.
Click-hold-move to
extreme right to pull out the tapes.
Do divination to call the Forgotten.
Buffet:
Go back to the buffet.
Play the tapes:
Right click either the tape or the tape recorder. Listen to the 'experiment'
of Mr. Bones and Amy.
Hear that the sounds
are made of 2 tones: one high and one low. Write down the sequence of high
and low tones.
Divination:
Now that you have 5 bones collected plus the 10 in the tin can and have
listened to the tapes, let's do a divination and call the Forgotten.
Automatically, the 5
bones in inventory are added to the tin can.
Look close at the
table. Pick up the tin can. Move the tin can to the right,
middle or left side of the
table. Check the sound made by the can on the left and then the sound at
right.
Compare these 2 sounds
to the sequence heard in the tape. Now reproduce that sequence using the tin
can.
Move the tin can on the sides of the table in the
sequence heard on the tape. Do not click or release the tin can.
Move it: L R (move to center) R L R (move to
center) R L.
Read the 4 numbers
formed by the bones - 4535. It is the phone number of the hotel.
Open the hotel
door.
Depot:
Go to the depot and the phone booth.
Use the phone:
Enter the left phone booth. SAVE your game here.
Pick up the receiver.
Insert the coin-farthing on the coin slot.
Flip the A lever. Talk
to the Dowerton Exchange operator.
Select the number you
want to call.
If a mistake is
done, flip the B lever to get the coin back or pull back.
- Select the numbers
found in the newspaper: 6813. Bonus Item found. Look in inventory at
the bonus.
- Select the numbers
shown by the bones: 4535.
Hear music and click like a
door is unlocked. There's a radio by the hotel door.
Buffet: Go back to the
buffet.
Go to the back area and door to hotel. The music heard
on the phone is from the radio and the now the door is unlock. Enter the hotel.
Look around the
hotel lobby.
Reception area:
Guest book April
1947: Open the guest book and see that you are a guest
here - November 5th, 2010.
The phone call to the
hotel booked the Inspector automatically to a room.
Pull back and
automatically take the key to room 3F.
Bell:
Press the bell 6 times. Bonus Item found.
First floor rooms:
Go up the stairs and see that the door to the first floor rooms is
closed.
Go back down.
Clock:
Check the clock left of the bar. Click on it and hear a gong and a child's
giggle.
Blocked hallway: Move the cursor left
of the clock and on the debris in the hallway.
Click to examine
closer. Use the flashlight.
Click on Dark Fall paper-pages on the floor left of
the chair. 2 pages are added to the Dark Fall red book in inventory.
Take
cellar key.
Cellar:
Pan left and look close at cellar door under the stairs.
Use the cellar key on
the lock of the door under the stairs. Use the flashlight.
Look around. See
another electrical panel on the wall at right.
Get power to the
hotel: Open the panel. See valves to turn on steam
pipes.
The aim of the
puzzle is to turn the valves to get the needle to the green area.
Turn valves at
bottom left and at left or the ones at 7 o'clock and 9 o'clock positions.
Something opened
above. It must the closed door to the first floor rooms.
Exit the cellar.
Reception area:
Text message:
you CORRUPTED the evidence
Reception desk:
Now that the lights are on, look around.
Check the pigeon
hole at back wall of the reception desk.
Top slot has a clue
to the safe lock.
2B has a
cigarette holder.
2E has a telegram
for AV from Dr. Wimley. Mother passed in the night.
Safe:
There's a safe at the backroom floor. We need the correct code for the safe.
Hallway:
Go to the hallway left of the reception desk.
See a radio with the
hotel cards on a table close to the front door.
Dowerton
Messenger: Click on the door basket and get another
#4 Dowerton Messenger and read about the Inspector being suspended.
Exercise book:
Look down on the floor.
Put together the
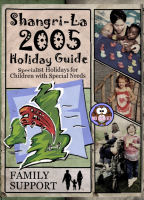
pieces of paper to form the Shangri-la Holiday brochure.
Shangri-la is a
place for special needs children.
Read the exercise
book for creative writing. Hazel was hurt in a fire?
Birthday
Invitation: See an invitation appears. The game to play
is statues.
Statues: The aim is to
turn your back and Amy walks closer to you.
Listen for a sound and turn to look at the correct
time. Listen to the creak
on the floor and then turn to look behind you.
If she doesn't say
anything, it was the correct time. Then automatically turn to face the door
or face away from her again.
If she says
something, then she goes back to the start.
When done correctly,
hear a roar. Take #1 artifact ring with icons.
Go forward towards
the stairs.
Text message:
SHE liKes to play gAMEs, as YOU KNOW (She k ame you know).
Check the first floor rooms.
First floor rooms:
Climb the stairs.
Look through the keyhole of room 1A and see a TV.
Look
through the keyhole of 1B and see scissors.
Buffet:
Go back to the buffet's outside doors. before you open the door, get messages.
Text message:
I caN play gaMEs too (In me).
Text message:
joIN uS IN room 1a (In sin).
Room 1A:
Go back to the hotel and up to room 1A.
See that room 1A is
now open. Enter the room.
Shadowkin:
The room is dark. See that the walls are full of eyes.
Hear something at the dark
right side of the room. See something come out of the floor.
A shadowkin comes
out and tries to reach you. When he does, get a cutscene of you being revived.
It took your life force.
Go back to room 1A.
TV's circuit panel:
Click on the TV. Immediately place the 4 circuit boards taken from Amy's
exercise book on the panel.
The aim of the puzzle is place the circuit boards so
that the wires are attached to the same colored wires or lights.
The circuit boards can be rotated by clicking on
them.
If done in time, the
TV clears up and the shadowkin disappear.
If not in time, find
yourself outside the room and have to enter the room and do the puzzle again.
Interrogation:
See a movie of the interrogation of Mr. Bones by the Inspector.
The aim of the puzzle
is to click on 4 active spots in the movie in correct order.
The clues for this
puzzle are in the room. Pull out of the TV close up.
Eyes:
Check the light switch left of the door. It does not work.
On the left of the
light switch, see an eye with #1 with bones drawn around it.
Turn to wall right
of door. See an eye with #2 and a magnifying lens drawn by it.
Turn right towards
the TV. See an eye with #4 with bats drawn around it.
Interrogation
puzzle: Click on Mr. Bones, then on Inspector, on the
shadow left of the Inspector and lastly on the bat looking shadow behind Mr.
Bones.
When done correctly,
the movie continues. Then a loud noise is heard. A hole in the wall to next
room appears.
Room 1C:
Enter through the hole in the wall.
Turn right to the door
and flip the light switch to have light in the room.
Look at the door and
see that the latch is missing the knob.
The room is full of
pupae.
Look around the room
and check the pictures. See that they have the same theme: stages of a
butterfly's life.
Turn the picture of
the butterfly on the dresser 5 times. Bonus Item found.
Pupae puzzle:
Turn off the light using the light switch. See that the pupae glow.
The aim of the puzzle here is to find a special pupa
when the lights are off.
Eventually, the pupae
lose the phosphorescence. Then turn on the light for the pupae to absorb more
light.
Then turn the lights
off to continue the search.
From the door, turn
right to face the hole on the wall.
Look up and see a pupa
that has a round black thing inside.
Click on it to see a
close up and get a knob.
Latch:
Look close at latch on door. Use the knob on the latch.
Slide the latch to
extreme right and then exit to the hallway.
Search for eyes.
First floor hallway:
Text message:
SeeK sIght unDer royal gaZe (SKIDZ).
Turn to left of room 1C door. See a picture of
Catherine Paar. Ah, the royal.
Where is she looking at? Turn to the opposite wall
(right of 1D door).
Under? Look down on that wall and see a hole.
Click on the hole. Eeeuuuh! Click again to see
what's in the hole. Take brown eye #1.
Text message:
i See from bEnEath the cathoDe rayS... (SEE D S - see the eyes?).
Room 1A: Go back to room 1A via
1C.
Cathode rays might mean TV. Look close at the floorboard below the TV.
See an eye under the board. We need a tool.
Room 1D: Go back to the
hallway outside 1C. Enter room 1D.
Look around. Look out the window and see a ladder or
maybe a trellis. Hear a woman crying outside.
Cabinet: Go left and check
the cabinet.
Open the right door by click-hold-move to extreme
right.
Look through the gap on the backboard. See another
room.
Bang - something dropped.
Exercise book: Pull-hold to
open the bottom left drawer.
Take and read Amy's exercise book about trees. See
pictures of Rowan and Ash leaves.
Pull back to room. Hear someone running and girl's
giggle.
Room 1B: Where did the
runner go?
Move the mattress propped by the window by
click-hold-move to extreme right.
See a hole on the wall. Enter room 1B.
Shadowkins: Use the
flashlight. Ahh! These are shadowkins! They took some life force. You are
revived again.
Scissors: Go to the
mattress. Take a pair of scissors. This place is one source of scissors
if needed.
Foils: While standing by the scissor covered mattress, look
down. Check the contents of some of the foils on the floor.
Room 1A: Go back to room 1A via
1D and 1C.
Look close at the eye on the floorboard below the
TV.
Use the scissors on the floorboard. Click-hold-move
up/down on the hole to dislodge the eye.
If the scissors breaks, get another from 1B.
Take blue eye #1.
Room 1D: Go to room 1D.
Text message: sHiny littlE
paRcels oF delIGHT (HER FIGHT)
Room 1B: Go to room 1B
where we saw that shiny parcels-foils.
Use flashlight. Go to the bed with scissors. Look
down on the floor and see the foils again.
Rummage through the foils and eventually (maybe
close to bottles at top) get green eye #1.
Room 1D: Go to room 1D and
check the cabinet again.
Text message: iN rEVERence
he WAITs for you (NEVER WAIT).
Open the cabinet.
Use the scissors on the opening at right side.
Click-hold-move up/down until the board is removed.
If the scissors break, get another one from 1B.
Room 1F: Look around.
See that the floors above are gone: 2F and your room
3F. Click on the sky.
Turn left and look at the door and see that there's
no doorknob.
Ivy: Go to window and see
ivy covered table. Remove the ivies by click-hold-move to extreme right.
A Tale of Four Sisters - Hazel:
See another book.
Read the book - A
Tale of Four Sisters. Learn the story of Hazel and how she was burned.
Take note that
Hazel has brown eyes.
Dark Fall pages: Turn to
dark area at left.
Use flashlight and take more Dark Fall pages
(4-6).
Take doorknob from floor. Use doorknob on
door lock and exit the room.
Room IE: A glowing symbol
is on the door of room IE. It is closed.
Hotel Door: Go right to
end of hallway and then left.
Open the door to outside. Breathe fresh air. Ahhh.
Go down and look around. Go back up the steps and
go back inside.
Storeroom: See a
mannequin at end of hallway. It is pointing to a door.
Enter through the door and be in the storeroom.
See another TV.
Text message: AMY can see thIS
place for what it is look CLOSER (AMY IS CLOSER).
Hear a giggle. Turn around and check the door -
Amy locked you in.
TV: Check the TV and see
one knob is missing.
Look around the shelves and see if you can find
anything useful.
Turn left. Go forward to the dark aisle between
the shelves.
Turn left twice to see the far left shelving on
the wall right of door and across the curtains
Take a can from the shelf and get the TV knob.
Curtain: Turn left to the
curtain.
Look close and see a string across the top part of
the curtain.
Use scissors on string to get light from the TV to
this part of the room.
Drawing of hotel: Turn
left and see drawing on wall. We saw Amy doing something on this picture in
a previous cutscene.
Click on the close up of the darkened window. Get
green eyes #2.
Exercise book: Look close
at crayons and book on top of the box.
Open the exercise book. Put together the pieces of
picture to see Daniel in the Lion's Den.
Hear Amy laugh and a click.
TV: Go back to the TV.
Use the TV knob on the TV.
Click to watch a series of pictures that might
signify birth and growth. The pictures are associated with symbols seen in
the Dark Fall book.
Exit the room.
Text message: Tickets plEASE!
(TEASE)
Depot: Tickets... Exit
through the door at end of hallway and go to the depot.
Enter the depot through the window. Go to the back
room where the staff takes tickets.
Check the bench close to the phone booths. Take
blue eye #2.
Text message: SeNse the chAnge
to the aiRwavEs (SNARE).
Buffet: Airwaves...
radio... Go to
the buffet.
Go to the back hallway by the hotel door and where
the radio is located.
Take brown eye #2 from the radio table.
Text message: THere's a nEw
GUESt at recepTion (THE GUEST).
The Forgotten - Gloria.
Reception desk: Go
through the hotel door.
No one is here. Check the Guest Book. Gloria
arrived in her car.
Gloria Grable is in room 1E. Ah the one with the
glowing symbol.
Take the key to room 1E.
1947 Room 1E: Go to room 1E.
Use the key on the door.
Collect Gloria's memories.
It's back to 1947. You are now Gloria Grable.
Look around. Take note of Gloria's comments about
things. Check
the window.
Turn to the table beside the bed.
Check the book on the shelf of the side table. It
is Holiday Haunts. Take note what Gloria says. This is random.
Check the Rappier cigarette pack. See a picture of
Matilda Fly.
Look close at the ashtray. Take colored round
piece #1.
There's a box with 5 circular holed
lock.
Check the bed. Take note what Gloria says. This is
random.
Check the pictures around the room.
Look close at the pictures above the side table.
Take colored round piece #2.
Check the Tower of London picture left of door.
Take note what Gloria says. This is random.
Look at the picture on back wall of a Fox Hunt.
Take note what Gloria says. This is random.
Chair: Turn left at back
of room and check the small hat box on the chair. Take colored round
piece #3.
Newspaper: Read the
newspaper on top of the dresser at the corner. Take note what Gloria says.
This is random.
Learn that Sly Fox (Gloria) robbed the Bank of
Britain. Her accomplice was shot down and Sly Fox escaped in a silver
motorcar.
Table: Look close at the
table with coffee cup. Take colored round piece #4. Read the order
paper.
Suitcase by door:
Open by click-hold-move up the suitcase by the door. It is full of blood
splattered money.
It's not enough, never enough.
Gloria wants
to hide the money and looks at the floor. The train is passing through.
Time goes back to present day 2010. If you want to
go back to 1947; click on the glowing symbol above the bed. If you then want
to come back to present day; open the suitcase.
Present day room 1E:
Check the room.
Look on top of dresser and take colored
round piece #5.
Life leech: Look close at
the life leech making sucking noises on top of the boards by the chair.
Kill the life leech using the scissors. Click the
scissors on the leech.
Wait until its movement slows a bit. Then click
the scissors to kill it.
Bloody money: Go by the
door. Turn around to face the chairs and look down.
Move the cursor on the floorboard until an active
spot is seen. This must be where Gloria hid the money.
Look close and see money peeking through the gap.
We need a tool.
Get scissors from room 1B. Exit the room; go
through 1F, then 1D and through the mattress to 1B. Get scissors. Go back to
room 1E.
Use the scissors on the gap on the floorboard.
Click-hold-move left/right to remove the floorboard.
Diary: Click-hold move to the left the
diary away from the bloody money.
Read the diary. Learn that she is a member of The
Agency and is somehow connected to the Nazi.
They were betrayed and her lover killed. Take the
bloodied paper money on the last page of the diary.
She wants to be with her lover forever.
1947 room 1E: Click on
the glowing symbol above the bed.
Be back in 1947.
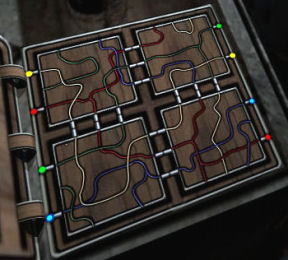
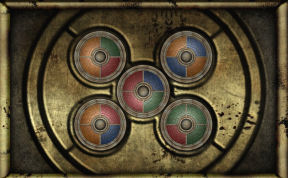
Open the case by the bed: Look
close at the case. Use the 5 colored round pieces on hole of the lock.
The aim of the puzzle is to have the same colors
adjacent to each other.
There are only 5 turns allowed. The puzzle then
resets. Pressing the center piece resets the puzzle also.
|
Bottom right piece - turn once.
Top right piece - turn once.
Bottom left piece - turn once.
Top left piece - turn twice.
Check the contents of the box.
|
|
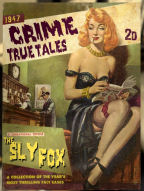
Magazine: Put together
the pieces of the Crime True Tales magazine.
Lover: Look close at
picture of Gloria's lover and accomplice. The name is random (Serge, Anton or Christoph).
Present day room 1E: Open the
suitcase and hear the train coming. Go back to present day 1E.
Help Gloria: It is time to heal
Gloria. Sit on the chair beside the boxes where you killed the life leech.
Place bloody money, crime magazine and steering
wheel with GG from the woods on the makeshift altar.
Gloria sits on the next chair behind the steering
wheel.
Questions: Talk to Gloria
completely. After the questions, ask - Can I help you?
She drives recklessly to kill herself again.
Ask her questions that pertain to her life as seen
from her dialogue in 1947 bedroom.
The choices for dialogues are the same but having
which ones are the correct dialogue are random.
So go through the dialogues to see which ones she
answers Yes, I must not forget or If only my life has been
different.
Choose dialogues based on what Gloria says when
the active spots are clicked on at the 1947 room.
Responses gathered by
Feeb88.
Thanks, Feeb88!
Bed:
She says... Looks comfy enough...but I'll never
sleep again.
Answer:
Why do you not wish to sleep again?
She says... Better than the beds in Holloway Prison.
Answer:
Did you spend time in jail, is that it?
She says... A single bed, for a mourning widow.
Answer:
Have you lost someone, close to you?
Tower picture:
She says... They'll never know they are fakes!
Answer: So, you were a master forger...quite a
talent.
She says... That place looks like a prison...and I should know.
Answer: There must be life after prison...
She says... A Royal Castle. Nothing to a failed aristocrat, like myself.
Answer: But you were born into a privileged life,
the aristocracy!
Book:
She says... I remember the Riviera, we were so in love.
Answer: But you were in love, you may be again.
Have hope.
She says... Why must I always travel alone?
Answer: You lead a lonely life, traveling alone.
She says... A lie. A ruse. A fabrication. I have no interest in staying
here.
Answer: You could still see the world. It's never
too late.
Newspaper on dresser:
She says... Not so sly now. I am finished.
Answer: So, your life of crime is over! Sly Fox!
She says... Who am I? Really? What am I?
Answer: The life you have led has left you
confused, broken.
She says... They have it all wrong. They know nothing about me.
Answer: The newspapers know nothing. Not even your
name.
Picture of lover in box:
She says... Oh, Anton...
Answer: Think about Anton, is this what he would
have wanted?
She says... Oh, Serge...
Answer: You were in love, you must remember Serge.
He loved you.
She says... Oh, Christoph...
Answer: Christoph may be waiting for you, in
another life
Gloria is healed. She gives artifact ring #2
and her lock pick.
Get to second floor.
Second floor: Go to main stairs and
climb to the second floor.
Go through the backdoor and then through the buffet or
go through the rooms in the first floor.
Unlock the 2nd floor gate:
Use flashlight on the hallway to second floor.
See that the gate is locked with several padlocks.
You need to unlock only one of them. :)
Use the lock pick on one padlock.
Lock picking:
There are 6 active spots on the rim of the lock:
NW, N, NE, SE, S and SW.
Click on those active spot on the rim of the lock to
turn the metals to that position. Do these until you hear a click and a TaDa
sound.
Then look for the second active spot that would
produce those positive sounds. The positive spots are not repeated.
Always start with the known positive spot(s) first
and then look for the next positive spot.
Four consecutive positive spots clicked will open
the padlock.
This is true for the padlock puzzles the rest of
the game.
Click on: top left (NW), right (E), top (N) and
bottom left (SW). The gate opens.
Another game to play.
Another invitation: Hear Amy.
Take the invitation beside the box on the chair.
You are invited to a party at 2C.
The party password is MALUS and the game to play is
Blind Man's Bluff.
Room 2C: Go forward to the
hallway. Enter the second door on the left.
Look around the séance room.
Ouija board: Look close at
the table and see that 2 more unseen guests are here.
Read leaflet about a séance here at the hotel on
November 5th 1953 by the Dowerton Psychic Society.
Click the letters: JONATHAN or BOAKES. Bonus item found.
Pull back from board.
Click on the letters of the password given by Amy
- MALUS.
Blind Man's Bluff: The room
changes and Amy is here. She wants to play Blind Man's Bluff.
Take a dirty blindfold from the pile. Automatically
wear the blindfold.
The object of the game is to click on Amy when she
passes by.
Just keep on clicking on her until she says 'you
got me'.
Take artifact ring #3. Exit the room.
Text Message: THere's a nEw
GUESt at recepTion (THE GUEST).
The Forgotten - Baby.
Room 2D: Enter 2D.
Hear a baby cry. See a crib at center of room.
Look in the crib. The room changes.
Read the newspaper on the chair. It is 1940 during
The Blitz. Hear the siren. Take the milk bottle.
Turn right and look at the bed. Read the clothing
book on the pillow.
Take the picture of mom and baby from the
bed.
Check the suitcase and take the picture of the
soldier daddy.
Take the baby rattle on the side table by the
door.
If you are slow in picking it up and the air
raid siren has been going on; the room will be bombed.
Start over by clicking on the crib during present
day time.
Place the milk bottle, the 2 pictures and baby
rattle in the crib.
Take an Andrew Verney music box. Hopefully
the baby is happy now.
Exit the room.
The Lost Forgotten.
Room 2A: Enter room 2A.
See a room full of scissors again. This is another
source of scissors aside for room 2B and the unopened metal box at backyard.
Take a scissor if you are not carrying one right now.
Hear a man crying. Turn right to the beds. Click on
the backroom to talk to the man.
Ah, that forgotten cannot be helped.
The Forgotten - Andrew.
Reception desk: Go down to
the reception desk. Remember there is a new guest.
Check the Guest Book. The new guest is Andrew
Verney in room 2E.
Take the key to room 2E.
Look at the telegram in the pigeon hole 2E at back
of reception desk. His mother passed away.
1947 Room 2E: Go up to Room
2E.
See a glowing symbol on the door. Use the key on
the lock.
You are now Andrew Verney in 1947.
Desk: Look close at the
desk.
Check the Home Guard book.
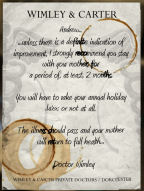
Doctor Wimley's letter:
Click on the envelope on the desk.
Put together the pieces of paper to form Dr.
Wimley's letter. Learn that Andrew's mother is ill.
Check the slots above the desk. Look at a note from the hotel about an item in the
safe.
Check the telegram on the middle slot that states
mother's health deteriorated. The doctor wants him to go home.
Side table: Go to the
side table by the bed.
Book: Check the book on
the side table. Read the book.
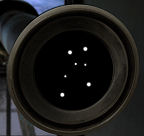
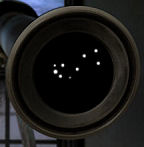
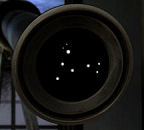
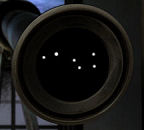
Learn that the cover illustration is the Fervian
constellation.
Andrew also wrote a book on Chinese Puzzle boxes.
He runs Curious Curiosities in Dorchester. The store sells clocks, puzzle
boxes and telescopes.
Take Andrew's picture from the cover of the
book by click-hold-move to extreme right.
See several constellations illustrated in the
pages of the book.
Bottom drawer: See the turned
over picture of mother at bottom drawer.
Pictures on wall: See
constellation pictures on wall.
Suitcase: Suitcase on
the bed is locked and no key in sight.
Lock picking: Use the lock pick on the suitcase.
There are 6 active spots on the rim of the
lock: NW, N, NE, SE, S and SW.
Click on those active spot on the rim of the lock to
turn the metals to that position. Do these until you hear a click and a TaDa
sound.
Then look for the second active spot that would
produce those positive sounds. The positive spots are not repeated.
Always start with the known positive spot(s) first
and then look for the next positive spot.
Four consecutive positive spots clicked will open
the padlock.
This is true for the padlock puzzle the rest of
the game.
Click on: bottom (S), top
right (NE), top left (NW) and top (N).
Take the telescope.
2nd floor hallway: Exit the
room and be at hallway.
Table: Pick a red
carnation from the vase. Play with the paper bird.
Read the newspaper headline and learn what happened
to Gloria-Sly Fox. She escaped with her lover. History is changed.
There's a Do Not Disturb card on 2F's door.
Telescope: Go left and down
the hallway. Check the painting of the old lady on the wall.
Go left and see a telescope stand. Place the telescope on the stand. Verney says he
needs the lens and the equatorial settings.
Present day second floor: Go
back to present time 2010 by walking down the hallway pass room 2E.
2010 Room 2E: Enter the
present day room of Andrew.
See the glowing symbol on the left wall. Click on
the symbol if you want to go back to 1947 room 2E.
Look behind the mattress and see mother's picture.
Look close and use the flashlight at the right
corner where the cabinet used to be.
See the artifact rings focusing on a rotating globe.
Exit the room.
Hallway: Go to the end of
the hallway where the telescope stand is located.
See the painting of the old lady on the chair.
Look close and pull back on the painting 6 times. Bonus item found.
Get the equatorial coordinates of the telescope:
See that the telescope stand is now rusty. Look close at the stand.
Read and note down the settings on the top of the
tripod. These 2 numbers are random.
Bathroom: Enter the bathroom
right of the telescope.
Life Leech: Go to the
right, forward to the bathtub with a razor and right on the table. See the
life leech.
Use the scissors to kill the life leech. If you
don't have scissors get one from room 2A.
Help Andrew: Use the now
cleared table as an altar.
Place the music box from the baby's crib, red
carnation and the picture of Andrew on the table.
Pull back.
Questions: Oops. Andrew is
taking a bath. Talk to Andrew completely.
You run a shop in Dorchester, Curious Curiosities.
Yes, you are right.
You were advised to stay home and not come here.
Yes, you are right.
You should have stayed by your mother's bedside.
Yes, you are right.
Andrew wants to finish his work first and Inspector
volunteered to help.
Andrew writes the code down on the divider. The
number written down is random.
Get the lens of the telescope from the safe:
Go down to the reception desk.
Look close at the clue to the safe's lock at the top
pigeon hole behind the reception desk.
Use the safe code guide to enter the code given by
Andrew.
Look close at safe at right. Enter the code given by
Andrew.
Click on the placement of the code numbers on the
cross shaped lock.
Take the telescope lens.
1947 Room 2E: Go back to room
2E. Click on the glowing symbol on the wall and be in 1947.
Do Andrew's work.
Telescope: Go to the
telescope and place the lens on the scope.
Look close at top of tripod and enter the
coordinates seen in 2010.
Note down the list of constellations that need to be
identified. The list is random.
Go back to Andrew's room and draw the
constellations for your own review. The constellations are illustrated on the walls and in the
book.
Go back to the telescope. Look through the lens.
Mark the square in the list if the constellation is
seen at center of lens.
Search for all the constellation in the list. Click
the lens to move to another constellation.
When done correctly, hear Andrew say that his work
is done and he can now go home.
After the white light, it is now back to present day
2010.
Thanks to Zak for the pictures of the
constellations.
 |
|
 |
|
 |
|
 |
| Camas |
|
Carsus |
|
Celidar |
|
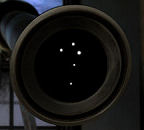
Elidor |
| |
|
|
|
|
|
|
 |
|
 |
|
 |
|
 |
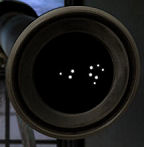
| Fervian |
|
Fristan |
|
Intera |
|
Karack |
| |
|
|
|
|
|
|
 |
|
 |
|
 |
|
 |
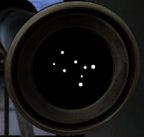
| Lepia |
|
Lorania |
|
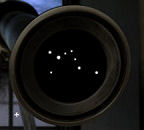
Malus |
|
Parlac |
Bathroom: Go to the bathroom.
Look close at bathtub. Take artifact ring #4 and wet doll.
Read the telegram. Mother is fully recovered.
Another invitation.
Hallway: Exit the bathroom
and go forward.
Text message: theRe
is somEthing you neeD to see... (RED ready).
Text message:
...Something you nEED to reMEmber (SEED ME Amy).
Walk down the hallway.
Text message: your
regRESsion begins on plaTform2 (REST)
Platform 2: Go to platform 2.
Text message: you'll meet
where THE owls are HUNTing (THE HUNT)
Tower: Go to the tower where
we heard the owls.
Climb up the ladder to top of tower. Use the flashlight.
Locks: Use the lock pick on
a padlock.
Click on: bottom left (SW), bottom
(S), top (N) and top right (NE).
Tower: Enter the tower.
Banging sound is heard.
Corrugated sheets: Click on
corrugated sheets at right side of the tower.
Move the corrugated sheets by click-hold-move to
extreme left.
See a skeleton. Take the coins from his eye
socket.
Take the envelope from the hand. It is Amy's
invitation to another party. The password is MORCANA. The place is at
the Séance room 2C and the game to play is Seven Seas.
In inventory, read the ID card. The skeleton is
Mr. Bones. He was a gardener at St. Swithin's School.
3 coffins: Pull back to
look at center of room.
See 3 coffins at center of room. Above each coffin
are leaves drawn on the wall.
Leaves on wall: Check Amy's
exercise book about trees to identify the leaves.
Ash is on the left, Rowan is at center and
presumably Hazel at right.
We need another doll to place on the third coffin.
Exit the tower by holding on the ladder.
Room 2C: Let's go to a party.
Go to room 2C.
Ouija board: Enter the room and go close to the table.
Click the letters: CRABTREE. Bonus item found.
Pull back from board. (Thanks, catsmom).
Enter the password by clicking the letters: MORCANA.
Seven Seas-Huffity Puffity: Play
Amy's game.
The object of the game is to face the direction of
the ship that
Amy mentions in her story.
Check the map and see that the windows in room 2C
face west.
The door is east. Amy is at north and the wall
behind you right now is south.
Follow Amy's words about the direction the ship
sailed to.
Take artifact ring #5.
The Forgotten - Matilda
Hallway: Exit the room.
Text message: THere's a nEw
GUESt at recepTion (The Guest).
Walk down the hallway towards the stairs. The scene
changes to 1947.
Turn around and see a food cart. Raise the dish
cover and take the gin bottle.
It's back to present day again.
Reception desk: Go down to
reception.
Check the Guest Book. The new guest is Matilda Fly
in room 2B.
See a smoked cigarette instead of key.
Platform 1: We saw
Matilda's picture before in a pack of cigarettes in Gloria's room.
Cigarette machine: Go
through buffet and out to platform 1.
Look close at the Rap(p)ier cigarette machine right
of the buffet door.
Use the 2 coins taken from Mr. Bones on the coin
slot.
Take the pack of Rapier cigarettes. Look
close-right click the pack of cigarettes in inventory.
Click the pack in close up and get Matilda
Fry's picture.
Room 2B: Go up to room
2B. Enter room 2B.
Life Leech: See a life
leech on the dressing table.
Use the scissor to kill the life leech.
Call Matilda: Place
Matilda's picture, cigarette holder and gin on the dressing table.
Pull back and hear Matilda. Talk to Matilda completely.
Matilda does a performance but delivers wrong lines. She asks you to
help.
She gives her key to 2B.
Exit the room and then use the key on 2B's door.
1947 2B: There's a
glowing symbol on the door. Enter the room.
Sober up: As Matilda, the
room is seen in double. She's drunk.
Look around the room first (do a 360 turn while
clicking on active spots), then
click on the ice bucket use the ice to sober up.
Learn about Matilda's life: Look around the room. Check the dressing table.
Script: Look close and read the script. Take note of the
script lines. Pull back and click to read and take note. You'll need it
later. Or you can take a picture and reference it later when needed. This is
random and depends on which paper you click on.
Check the pictures of Matilda.
Newspaper: Read the newspaper on the dresser. Matilda was
drunk and wearing the wrong costume in her show - The Two Faced Bride of Bodmin Moor
at the Empire Theatre.
Bed: Check the bed and
see a note from Charles under the pillow.
Check the Empire Theatre poster for the show with
her silhouette wearing a feathered hat and sash.
Check the frames on the wall above the bed.
Flowers: Look at the
flowers at the settee. It came from Charles.
2010 2B: Click on the
symbol on the wall right of dressing table to go to present day.
Talk to Matilda by clicking on the chair. Can I
help you?
You were drunk. The gin ruined your performance.
The show must go on. Let's knock them dead.
The review was correct; you did wear the wrong
outfit. My costume. Which one is it?
Charles must have a soft spot for you, he
could be in love. Charles is such a sweetie.
You should have worn the sash, feathered hat
and earrings. That's not quite right but no one will notice.
You were performing at the Empire Theatre.
The show must go on. Let's knock them dead.
Prompt Matilda her lines. The lines are random
depending on which paper on the 1947 dressing table was clicked on. Use
your notes or screen capture of the script as clues.
Matilda is a success!
See a newspaper that showed that the 3
forgotten have changed history.
She gives the artifact ring #6.
Look in the bucket on the dressing table. Take
the water dispenser bottle.
Free
Mr. Bones.
The Alleyway behind the depot:
Go back to the alleyway that leads to the ladies room and power shed.
Metal box: Look close at
the workbox behind the fire in the barrel.
Look close at metal box. Open the metal box with the
lock pick.
It is filled with scissors. Take a scissor if
you want.
Fire in the barrel: Use the
water dispenser bottle on the fire in the barrel.
Take burned doll.
Text message: the otHers
hAve gone. They are frEe (HATE).
Go to the alleyway.
Text message: oNly yOu, me
and AMY NOW (NO AMY NOW).
Platform 1: Go forward
to platform 1.
Text message: you killeD
bonEs stAbbed To deaTH (DEATH).
Tower: Go across the rail,
the woods and tower.
Text message: you Must sEt
him FREE. Use ThE siSTers (ME FREE U TEST).
Identify the dolls:
Leaves: Based on
Amy's exercise book; note that the leaves on the wall are from left to
right: Ash, Rowan and Hazel.
Color of eyes: Based on
The Tales of Four Sisters, the color of the eyes of Ashley is blue;
Rowan has green and Hazel has brown eyes.
Cause of death: Based on
The Tales of Four Sisters, the cause of death of Ashley was torn
apart; Rowan drowned and Hazel was burned.
Place the dolls in the coffin:
Place dolls (from left to right): pulled apart doll, drowned doll and the
burned doll.
Place the eyes on the dolls:
Use eyes on dolls (from left to right) blue, green and brown.
Take the artifact ball formed by the joined
lights of the dolls. Mr. Bones is freed.
Exit the tower.
The Inspector.
Third floor: Go to the third
floor of the hotel
Text message:
nowHere to hIDe. nowHERE to run (HID
HERE)
Text message:
all IS REaDy. ROOM 3F iS waiting
(IS RED ROOM 3FS)
Text message:
yoU need to KNOW the truth. about ME (U
KNOW ME).
Text message:
you DO knoW me. bettER Than yOu thiNk (DOWERTON
)
Text message:
I am YOU. Your guilt, your
conscience, your ECHO (I YOU ECHO).
Third floor stairs:
Climb up to third floor and be stopped.
Activate the Artifact:
Review the Dark Fall red book.
Take note of the Roman Numerals and corresponding
symbol beside it seen at bottom of each page.
Arrange the symbols on the ring to the same order as
seen in the book.
Start the arrangement with and using the inner ring
as VI and the outer ring as I.
If done correctly, the artifact is activated. I
think this puzzle is random.
Climb up again and use the activated artifact on the
black mist.
Third floor hallway:
Look at the side alcoves and see mannequins holding
a red mass.
Click on each 5 mannequins and hear different stages
of heart beats as read by an ECG machine.
The aim of the puzzle is to click the mannequin from
the normal heart reading to a flat lined non-beating heart.
Click on mannequins at: middle right (3D), bottom
left (3A), middle left (3C), bottom right (3B) and top left (3E).
You're heart has stopped beating.
The previously dark 3F door is now seen.
Room 3F: SAVE GAME here.
Use the 3F key on door. Enter and see that it is the
interrogation room.
Look around the room. Check all the pictures on the
right wall.
Look-click at the people behind the glass wall.
Listen to the tape recorder of Mr. Bones'
interrogation
Decision: Amy wants to go but someone must
stay here.
Choices:
Yes, my little friend, you can leave. I will stay.
I do not belong here. It is not my game. You will
stay.
SELECT.
One of the above choices will have one additional
puzzle.
Use the lock pick on the padlock on the door.
Click at bottom left (SW), bottom (S), top (N) and
top right (NE) rim of the padlock.
Did you go or did you stay?
This document may not be
distributed without express written permission of the author and the content may
not be altered in any way.
For Questions or Comments on
this Walkthrough,
Please write to:
MaGtRo